Looking for any tips on equipment or techniques for photographing things in the water, from the river bank or shore.
The best I have done so far is to use my SLR with zoom lens in manual focus mode, but the images still aren’t great.
Recent example: https://inaturalist.nz/observations/145297407
Even though it’s bout underwater photog, it’s relevant for you, cause the best shot you will get from the shore of something in the water is if you can put the camera underwater – a waterproof one or in a case.
https://forum.inaturalist.org/t/underwater-photography-equipment/30468/3
Olympus can be hard to use if you yourself is out water, so if you have a simple mask that lets you see the screen underwater, it’s an adventage.
With regular DLSR my best advice is try to get as vertically above the subject as possible, it eliminates most of sparkles and distortion, but with waves nothing can help you.
e.g. https://www.inaturalist.org/observations/26683347
2 Likes
Yeah, getting your camera under the water is best as it cuts down the distortion and refraction from the surface. If you can’t do that, maybe try a circular polarizing filter? That should reduce glare a bit.
In post-processing, I’ve found that increasing contrast or using something like Lightroom’s Dehaze tool can help a bit, especially if you shoot in RAW.
1 Like
+1 for grabbing an underwater camera, if you have the funds. The Olympus TG series is awesome and you do not need to get the latest one to get great results, which is nice for the budget.
Here are a couple of links to images I have taken on my reef walks & exploring tide pools with just the camera, no housing, no extra lighting. All were taken without me putting my head in the water at all.
https://www.inaturalist.org/observations/19857012
https://www.inaturalist.org/observations/19093473
I don’t even bother with my dslr while walking and usually not even while snorkelling.
Use a polarizing filter. Water is mostly a dielectric, so reflections will be polarized. At some angle, the reflection is 100% polarized. Here are some examples:
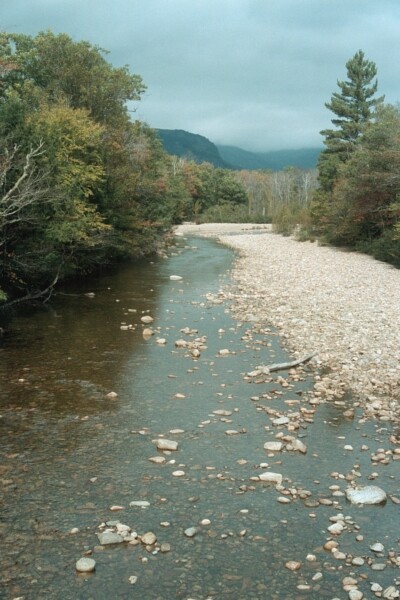
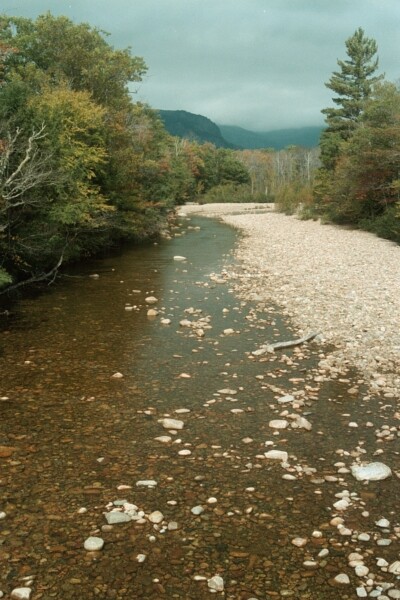
These two pictures only differ in the orientation of the polarizing filter. In the first, the polarizer was rotated to select for the reflections off the water. In the second it suppressed them.
Here is another picture that shows what you can see under still water when the reflections have been mostly nulled out:
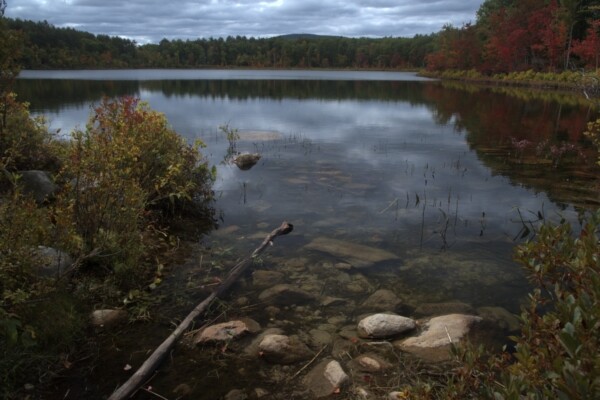
Polarization was near total at the bottom of the picture, so you see only what is under the water. The rocks at bottom are more visible in this picture than they were to the naked eye.
One thing to beware is the confusion between linear and circular polarizing filters. Light can be polarized both linearly (waves aligned in one plane), or circularly (it has a left or right handedness). What you want is a filter that passes one orientation of linearly polarized light.
However, if you get just that, then the polarized light can fool the automatic metering of some digital cameras. As a result, for modern photographic purposes, polarizing filters start with a linear polarizer, but then add something after it that sortof “scrambles” the resulting polarization. (Yes, I’m being quite loose with the physics here. Those that would actually understand the more correct physics wouldn’t have the confusion I’m trying to clear up in the first place). Unfortunately, those filters have become known as “circular” polarizers in photographic jargon, even though they select one orientation of linearly polarized light. When you buy a filter for your camera from a photography store, you want a “circular polarizer” if that’s what your camera requires. If you’re not sure, assume your camera requires it.
3 Likes
if you’re trying to get photos of subjects below the water from above the water, i think the most important things are just clear / still water and good lighting / angles. to me, this isn’t much different from just finding the right light and angles to take good photos of things above the water.
when looking at the photos in your example observation, it looks to me like the biggest hurdle is that the water is murky and/or wavy, and there’s not much you can do to correct for that, except maybe wait for the water to settle if it had been stirred up, or else go underwater.
i think circular polarizers have their place if you’re trying to cut glare, but in most cases, i tend to go without one even if i have one in my backpack. to me, they can make photos look unnatural, and i feel like they often just take too much effort to fiddle with. (you have to rotate them to some unknown angle to cut down on the maximum glare, and i think that process just distracts me more than anything else.)
assuming you have some space to move around, i find it’s usually easier / faster to handle glare by just moving around to find an angle that doesn’t have a lot of glare. you probably won’t be able to cut as much glare as with a polarizer, but most of the time, you’ll be able to find an angle that’ll be good enough.
here are examples of sunfish photographed using different ways of cutting glare:
- polarizer: https://www.inaturalist.org/observations/66921532
- good angle: https://www.inaturalist.org/observations/66154558
- shade: https://www.inaturalist.org/observations/55817263
below is an observation that includes a video that may help to show how different angles and water depth affect the quality of images you’ll be able to get. at the beginning of the video, the Rubyspot nymph is in maybe a few inches of water, and the camera is pointed away from the sun. so the Rubyspot is relatively clear, other than some waviness due to the motion of the water. at the end of the video, the Rubyspot has gone just a few more inches into the water, and the camera is pointing from a different angle, more in the direction of the sun. so you get a ton of glare and see all the particles in the water.
I built a hack to use my smartphone under water https://forum.inaturalist.org/t/life-hacks-for-naturalists/4636/95 from pondside/ dockside/ or boatside. The video footage turned out quite well.
One could make something larger by gluing plexi to the bottom of a bucket. Check it out for leaks first well before you place your dslr in it. These hacks are intended for those who can’t afford to get the latest and greatest equipment and probably cost less than $50 and time.
I haven’t tried these myself but I’ve met two naturalists who used waterproof cameras on the end of a selfie stick. One was using a GoPro on a standard self stick that they used to gently lower the camera into the water. The other had an Olympus TG and a number of homemade rigs including a selfie stick equivalent and a ‘fishing’ rig that included a pole, some line, a float and some weights that help the camera suspended in the water. Both had good photos and neither had to brave the very frigid local waters.
Thanks for all the suggestions everybody. I think the first thing I’ll try is the polarizing filter…
An example of post-shooting processing possibilities. First shot is off the camera file, second is my attempt to pull out something.
https://www.inaturalist.ca/observations/137914459
Taken with a Canon SX540 HS zoom bridge camera from about 30 feet away, off a pier. (No polarizing filter)
1.) create shade to shoot stuff out of water in intertidal places, works wonders, and you dont have to get your camera or hands wet!
2.) get an underwater camera and a snorkel, I’m really not impressed with my GoPro at the depths we work at, but the Oly TG series will get the job done, I own two and like them… okay.
but by now, there could be better options on the market, or available in your area, new or used, so research all your options.
also freediving below 3-4 m will dramatically improve the clarity and contrast of your shots.
This topic was automatically closed 60 days after the last reply. New replies are no longer allowed.